You have no items in your shopping cart.
25
Feb

Pedalboard Patch Cables - Everything you need to know!
Every day there seems to be a new patch lead option available. The new, “Best Patch Cables”, lower profile plugs and even LOWER impedance cables that are sure to be the new trend in the pedalboard world.
How do you stay on top of these changes? Do they really matter and what details should you actually pay attention to?
I'm glad you asked.
In today's blog we are going to talk about the patch lead details you really need to know for your next pedalboard build!
The Different Types of Pedalboard Patch Leads
 Depending on the type of gear you have on your pedalboard, you may need more than 10 different types of cables to bring your new rig together!
We aren’t going to cover every different possible cable you’ll ever come across, but let’s go through some of the main ones, their other known names, and when they are used in your rig.
TS Patch Lead

These are the foundational cables of every pedalboard. They are the most commonly used and most widely known.
This unbalanced cable is responsible for every note you play through your board. If one of these cables goes down in the middle of a show, the rest of your board goes down with it. For this reason you don’t want to get the cheapest available guitar leads for your pedals but rather something that is robust enough to get the job done for years to come (more on this further down).
To hook these cables up, plug one end into the output of your first pedal and connect it to the input of the next pedal on your pedalboard. Do this until you reach the last effect pedal on your board.
There are as many names for these cables as there are Klon clones. Whether you call them quarter inch cables or mono patch leads, the long list of names point to the same thing, an unbalanced cable with a ¼” / 6.35mm TS plug on each end.
TRS Pedalboard Cable

Similar to the mono patch cable above, the TRS patch lead (Tip, Ring and Sleeve) is used for a wide range of different purposes.
A TRS (or stereo / balanced) cable can be used for everything from carrying midi messages to the latest boutique effect, to connecting expression pedals to effects on your board. It can be used to carry your guitar’s signal, digital messages, resistance values and more.
Although it’s not as common as its mono counterpart, many pedalboards simply could not function without it.
This lead can be identified by the extra ‘ring’ on the plug and is also referred to as a stereo, TRS, or balanced ¼” cable.
TRS to Dual Mono Cable
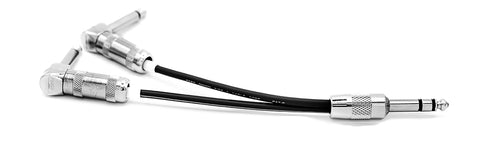
This is a fun one. Also referred to as an Insert, Y, or TRS to Dual TS cable, this piece of copper and plastic is as specialised as they come.
This cable is often used with midi controllers or used to turn a passive volume pedal into an expression pedal. It is the odd middle child of our first two cable types. Part TRS, part mono, this cable can be identified by the TRS plug on one end and with a breakout cable attached (two individual leads exiting the TRS plug) to two TS plugs on the other end.
One TS plug is connected to the TRS Tip, the other is connected to the TRS Ring while all the plugs share a ground.
These are still common enough to be easily found online and in a lot of music stores, but the majority of you reading may have never had the need for one. Though once you do, they become invaluable.
Cable Matters!


Cables are all the same right? Just a couple of quarter inch plugs connected to some copper.
Wrong!
No cable on planet earth is going to help your tone. Every cable will damage your signal in some way, shape or form. Choosing a cable that does the least amount of harm is essential. This is even more true for larger boards.
What is the difference between cable types?
The majority of cables are essentially the same on the inside with a different brand name on the outside. Most companies use similar materials and specs leading, which unsurprisingly leads to similar results. A lot of cable companies will brag about their low impedance cable sounding better than the rest, but as soon as you plug into your pedalboard (and buffer your signal), all of that goes out the window. It simply doesn’t matter the way the music industry has led us to believe.
Instead, trust your ears. Do some listening and see what sounds best to you! If you want to hear more on this, check out this interview with Tony Farinella. Tony is the owner of Evidence Audio and he’s spent the last 25+ years perfecting his ears and the cable that is carrying your precious tones.
If you want to hear the difference between cables, swap your common solderless brand for a soldered Mogami 2319 - This is by far the most commented on change from Goodwood Audio customers. Our customers love the switch to Mogami.
Choosing Evidence Audio Monorail is an even more drastic change - a solid core cable designed to do the least ‘damage’ possible to your tone.
No matter what you decide, trust your ears and stay away from the ‘for sale’ bin of cheap, multi-coloured cables at your local music store. Even if your wallet tells you, “YES” when they inevitably fail mid gig, your lead singer will be sure to scream, “NO!”
Plug types and where to use them

If you’re considering going the soldered cable route, you will need to know a bit about the different plug types available to you. There are more and more becoming available with smaller and smaller specs. When do these small plugs matter and when are they a waste of money?
The plugs I’m going to list below apply to both TS (mono) and TRS (stereo) cables. There are more plugs available than I will list, but these cover the majority of styles that are readily available.


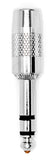
Pancake Plug - This is a great ‘all rounder’ plug. If you’re plugging from guitar to pedals to amp without any fancy stuff going on in between, this is the plug for you. It's low profile, affordable and easy to use.


Right Angle Plug - This plug is not as wide as a pancake plug which makes it ideal for a range of applications. This is a great option if you are going to run stereo effects (where the jacks are often too close together to use pancake plugs). If there are any instances where you have pedal jacks that are close together, this is the plug for you.

Short Body Straight - This plug is great for true bypass loopers. When jacks are stacked two or three high, a right angle isn’t going to be the best choice as they will run into each other. A short body straight will ‘extend’ the footprint of your looper by just over an inch, but it will make it easy to patch in and use. Just make sure you leave enough space so this plug doesn’t bump into other pedals on your board.


Square Plug (and other mini plugs) - These ultra low profile plugs will fit just about anywhere. They are designed with packed rigs in mind where even just an extra millimeter or two will be the difference between having that chorus pedal on the board or not.
Other than their small size, they aren’t any different to any of the above plugs. They can still be soldered relatively easily and they plug in and out of pedals the same way. The only note on these mini plugs is that you need to check your cable / plug specs ahead of time. Not all standard patch cable will fit as easily in the smaller form factor.
Lastly. These plugs generally come at a slightly higher price point, so be prepared to pay to have that little bit of additional space on your board.
Solder Or Suffer!
This is nothing new, so we won’t spend too much time here.
In short, there are two main ways to make a standard, mono patch cable; Soldered or Solderless.
Solderless cables have the advantage of being able to be made, repaired and tweaked just about anywhere with no power and very little tools. The downside however is that they notoriously crackle and fail.
A soldered cable on the other hand connects the plug to the cable with molten metals (usually tin and lead), so the connections are much harder wearing and longer lasting. The downside with soldered cables is they are harder to repair without a soldering iron and a bit of time.
All in all, soldered cables will last, solderless cables will not.
Think About Cable Routing In Advance

This point may be a little less obvious, but it will save you headaches and lots of time down the road.
When you’re finally sitting down after a long week of playing gigs, drinking craft beer, catching up on New Girl and it's time to rewire your pedalboard, I want to point out that your cable channels (where your cables will run between pedals on your board) should be planned out BEFORE you start making cables.
Don’t get me wrong, you don’t need to meticulously plan out every single cable and never deviate from your plan, but it will serve you well to know if you will inadvertently need to route 20 cables down one channel on your board that can only hold 8. Have a rough idea in advance where you plan on running your cables.
You might realise that between your first and second overdrive you will need to run 10 cables and three DC power cables. Maybe spread those two pedals out a bit to allow for this.
Once you have a rough plan in place, wire your board while keeping a bit of extra slack on your cables to allow for future pedal changes. We do this by “looping” our cables at their destination. Instead of finding the shortest possible distance between point A and B, we generously route the cable, making sure not to cut corners. Then we go past the destination jack and loop back to the pedal jack. This usually gives an extra 2-3 inches of cable without making the board messy. In the future, if you swap from a side jack to top jack pedal, those extra few inches will be invaluable.
There are plenty of cables out there, many more than we can cover in the space of this blog, but hopefully this has given you a bit more insight into what you can look out for and prioritize in your next pedalboard build.
As always, feel free to get in touch with any questions you may have about your pedalboard, we’re here to help!
